
How to Set Up ThrottleStop
Before changing any CPU settings, the setup matters. This ThrottleStop guide starts with preparation and basic monitoring, not tuning (we’ll cover that later). Many problems people blame on ThrottleStop come from skipping this stage. A clean setup helps you confirm the tool is working and reading values correctly before you touch voltage or power limits.
Before You Start
ThrottleStop does not work properly on every system out of the box. On some Windows laptops, Virtualization-Based Security (VBS) can block voltage control. This does not affect everyone. If ThrottleStop shows fixed or strange voltage numbers, or ignores offset changes, VBS is likely active. Here’s how to turn it off:
- 1Open Settings. Navigate to
Privacy & Security. - 2Click on Windows Security and select
Device Security. - 3Here, you’ll see Core Isolation. Switch
Memory Integrityoff, then restart your PC.
Download and Quick Setup
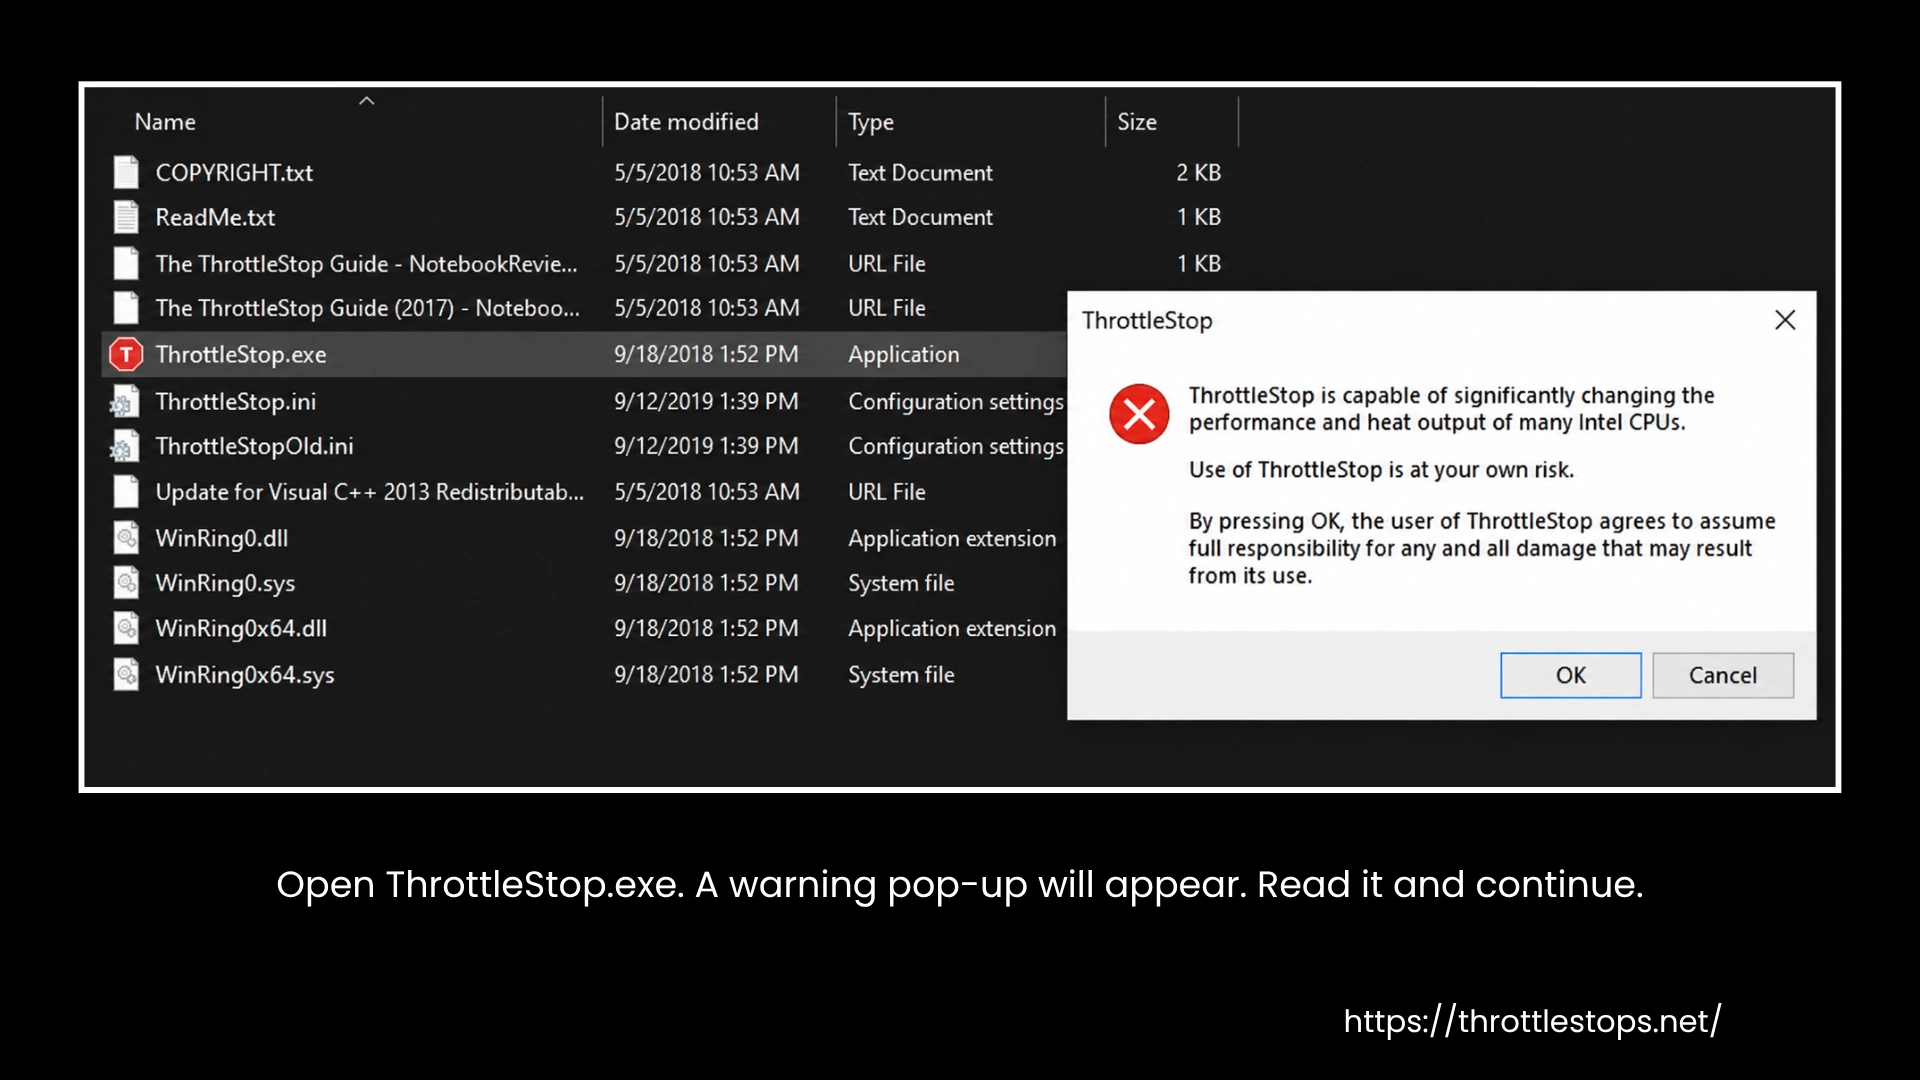
Download ThrottleStop from our website and extract it into a permanent folder, not the desktop. Open ThrottleStop.exe and accept the disclaimer. The main window shows CPU temperature, usage (C0%), and max recorded heat. Turn on logging to track behavior during normal use.
Resetting Settings
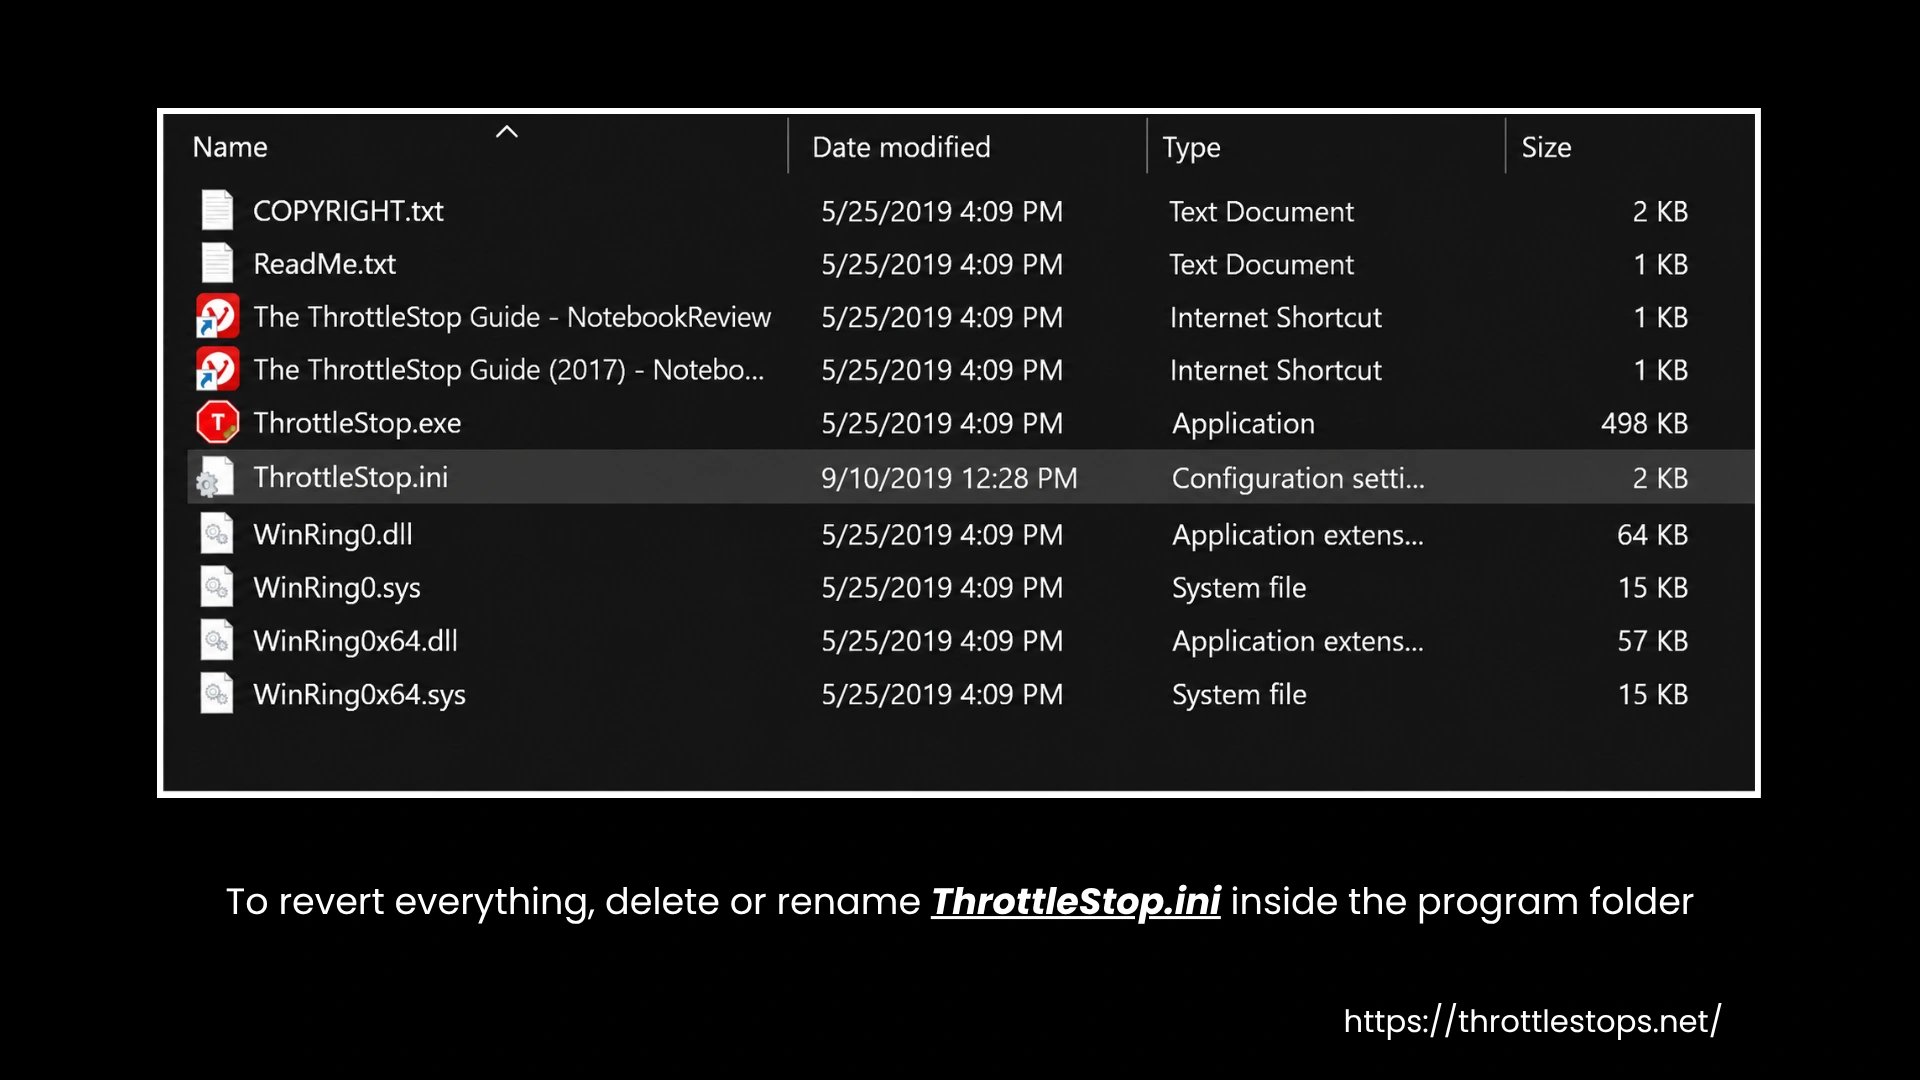
Always know when to turn it off. If something crashes or the readings look wrong, close ThrottleStop, delete ThrottleStop.ini, then fully shut down and power the system back on. This restores the factory CPU settings.
ThrottleStop Settings Interface Guide
Many users say opening ThrottleStop feels like sitting in a cockpit full of switches and readouts. That feeling is accurate. Before learning optimization, undervolting, overclocking, or Turbo Boost control, you need to understand what each part does. There is no single perfect setup.
Results depend on your laptop, CPU, cooling, and usage. This section explains the ThrottleStop settings so the later steps make sense. If you want to know how to use ThrottleStop on a laptop properly, this interface breakdown is essential.
Some of the Latest Features
ThrottleStop 9.7 introduced layout and control changes that affect where key settings are located. Knowing these changes can help you avoid confusion when following older guides.
- Custom logo support: You can replace the default ThrottleStop logo by placing an image named
logo.pngin the program folder. This feature is for visual purposes only and is not related to setup. The image must be 230 × 90 pixels or smaller. - Quick minimize via MHz or VID: Clicking the “MHz” or “VID” numbers minimizes ThrottleStop. It minimizes the tray or taskbar based on your Options setting.
- V/F Point replaces mV Boost @ 800 MHz: Voltage tuning now uses V/F Points (it was mV Boost before) in the FIVR window. Instead of a single offset box, you enter voltage values for specific frequencies (such as 800 MHz) in a table. You must tick the boxes to activate them. The Sync button copies values across profiles.
- PROCHOT Offset moved to TPL: PROCHOT Offset controls no longer sit in Options. They now live inside the Turbo Power Limits (TPL) window. Find the PROCHOT Offset adjustment and its Lock checkbox by clicking TPL on the right side of the window next to FIVR.
- Profile-based PL1 and PL2: You can assign different power limits to each profile using the dots at the top of the TPL screen. This allows separate limits for plugged-in and battery use.
Main Window: Bottom Section
The bottom bar contains control and testing tools. These do not tune performance directly but support everything else.
- Save: Write your current configuration to
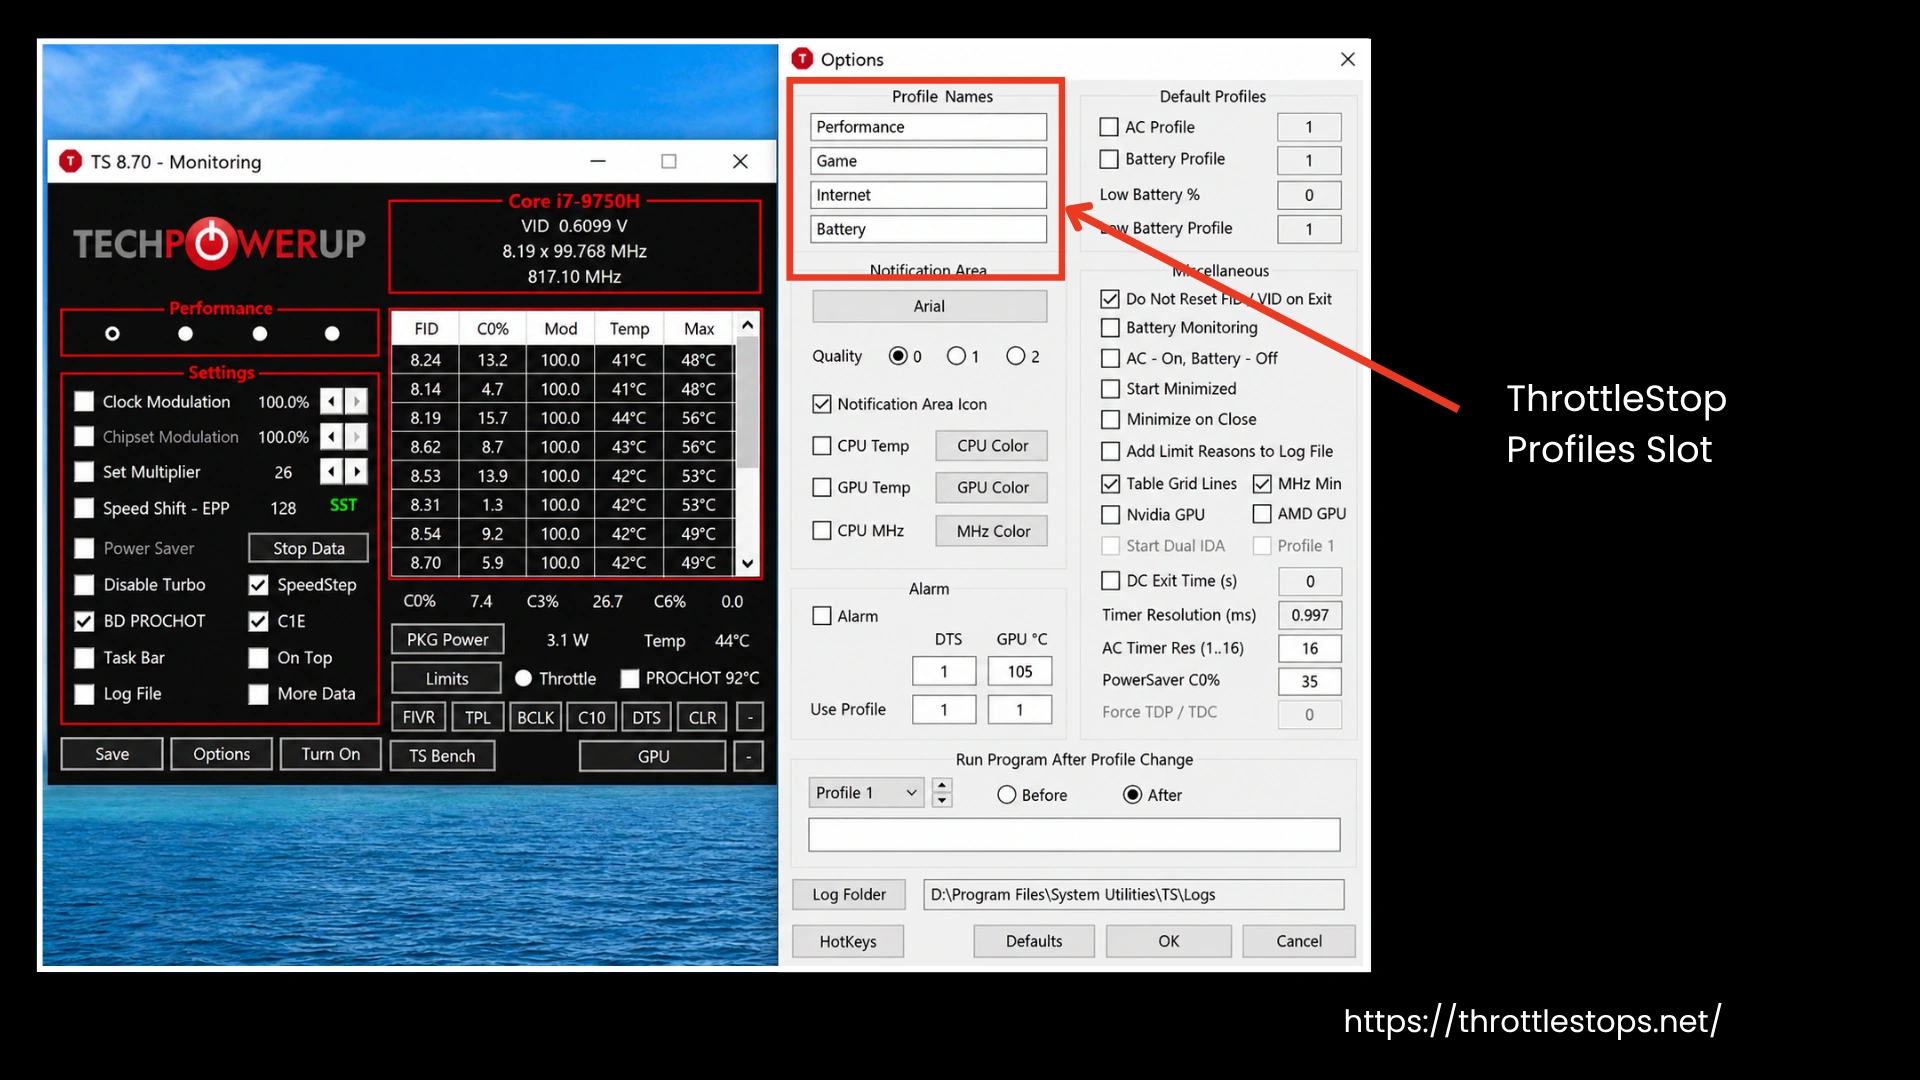
ThrottleStop.iniin the program folder. - Options: Opens the Options window, where profiles, startup behavior, alarms, and GPU monitoring live. (more on this below)
- Turn On / Turn Off: This button no longer meaningfully changes CPU behavior. If ThrottleStop is open, it is active.
- TS Bench: A lightweight built-in benchmark. It helps spot instability after small changes. It does not replace full stress tests.
- Profiles (top-left radio buttons): The four radio buttons act as distinct presets for different tasks. Since most settings are profile-specific, you can easily toggle between custom power configurations tailored for gaming, working, or battery.
Main Window: Left Section
The left panel controls how the CPU behaves and how ThrottleStop interacts with power management. This area looks dense, but many options are legacy.
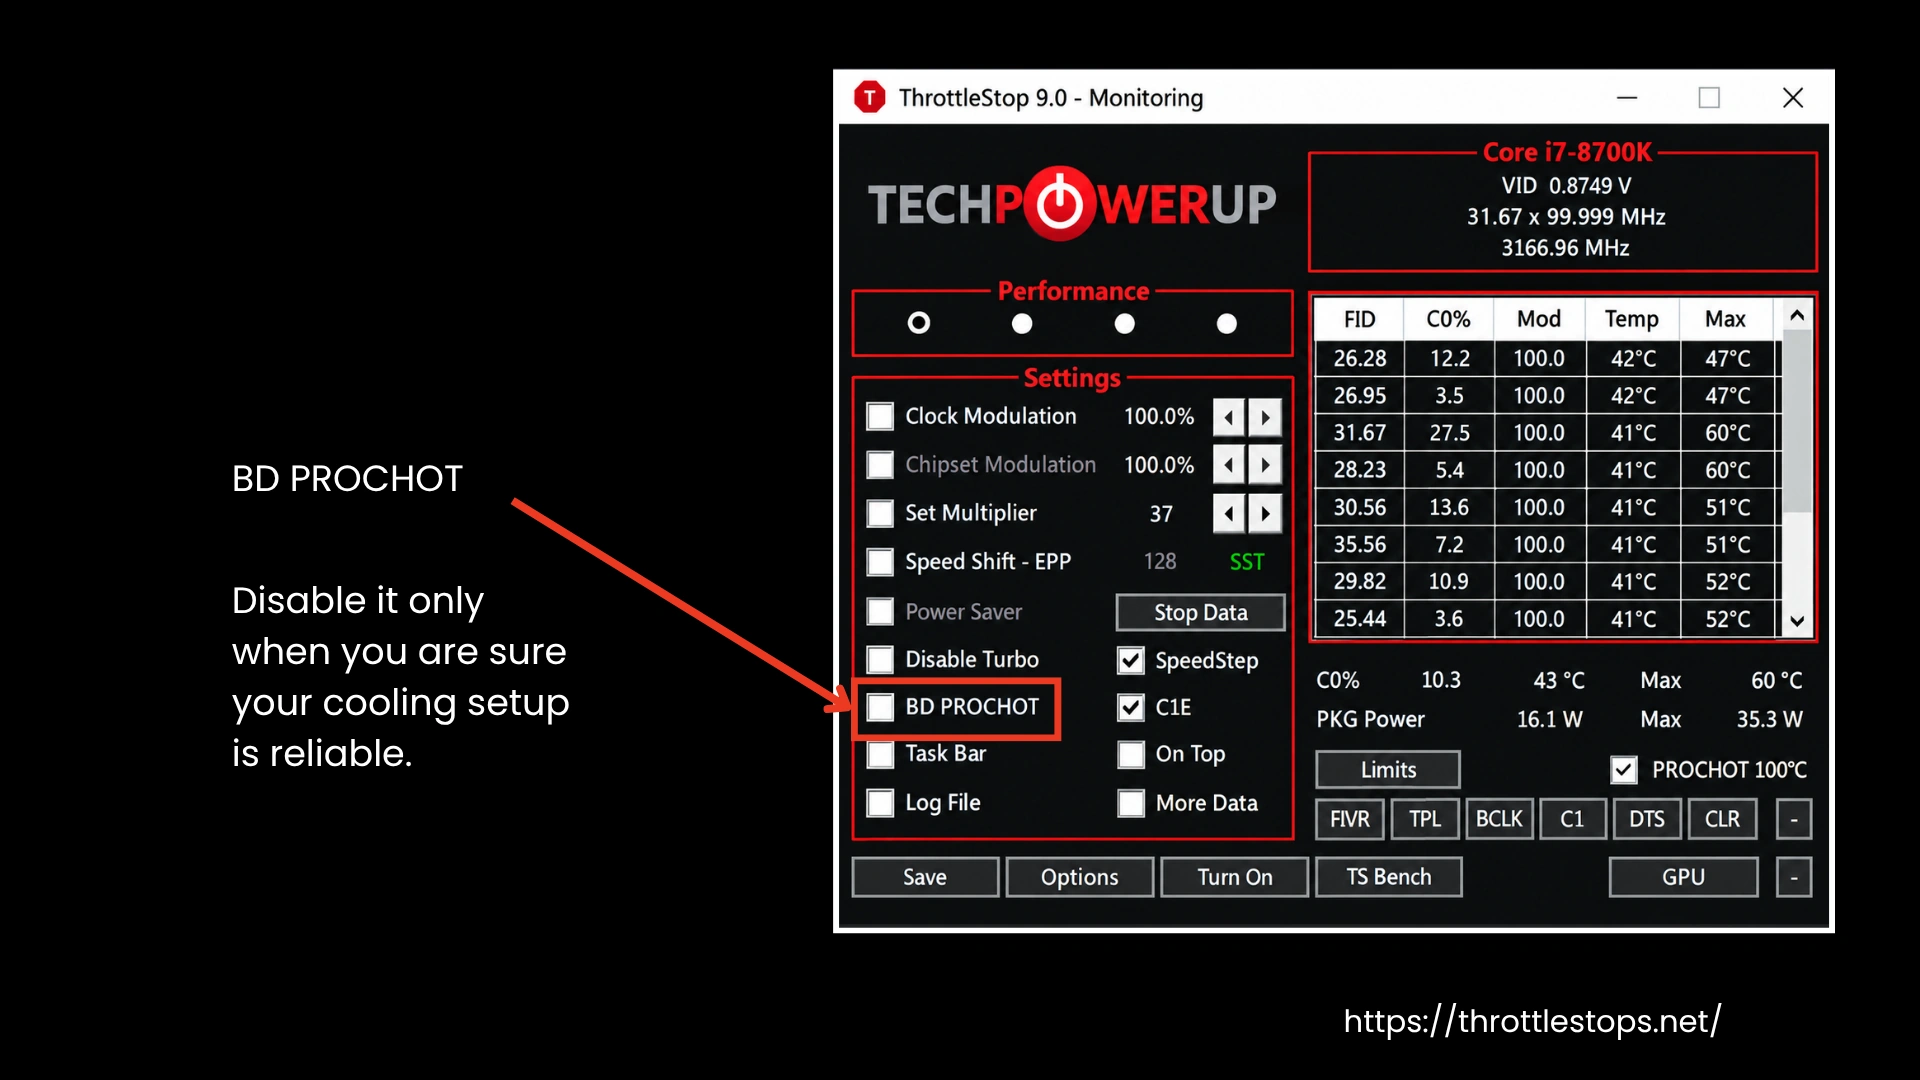
- Clock Modulation / Chipset Clock Modulation: These target an old throttling method that forced CPUs to run at partial capacity. Modern CPUs do not use this method. Changing these usually does nothing.
- Set Multiplier: Another legacy option. On modern Intel CPUs, raising it does not push clock speeds higher. Lowering it behaves the same as leaving it unused.
- Speed Shift – EPP (Energy Performance Preference): Introduced with Intel Skylake (Core i7-6700K, Core i5-6500, etc.), Speed Shift allows the CPU to manage frequency changes internally instead of relying on software. This improves response time and efficiency. If supported, it should stay enabled.
- Speed Shift – EPP values (0–255): Speed Shift EPP values (0–255) control CPU boost aggression. Lower values like 0–32 prioritize high speeds for performance, while 128 or higher favor efficiency and cooler operation. Lowering the value increases clock speed responsiveness.
- Power Saver: A legacy option that only works when Turbo Boost is disabled. On modern CPUs, it adds no value.
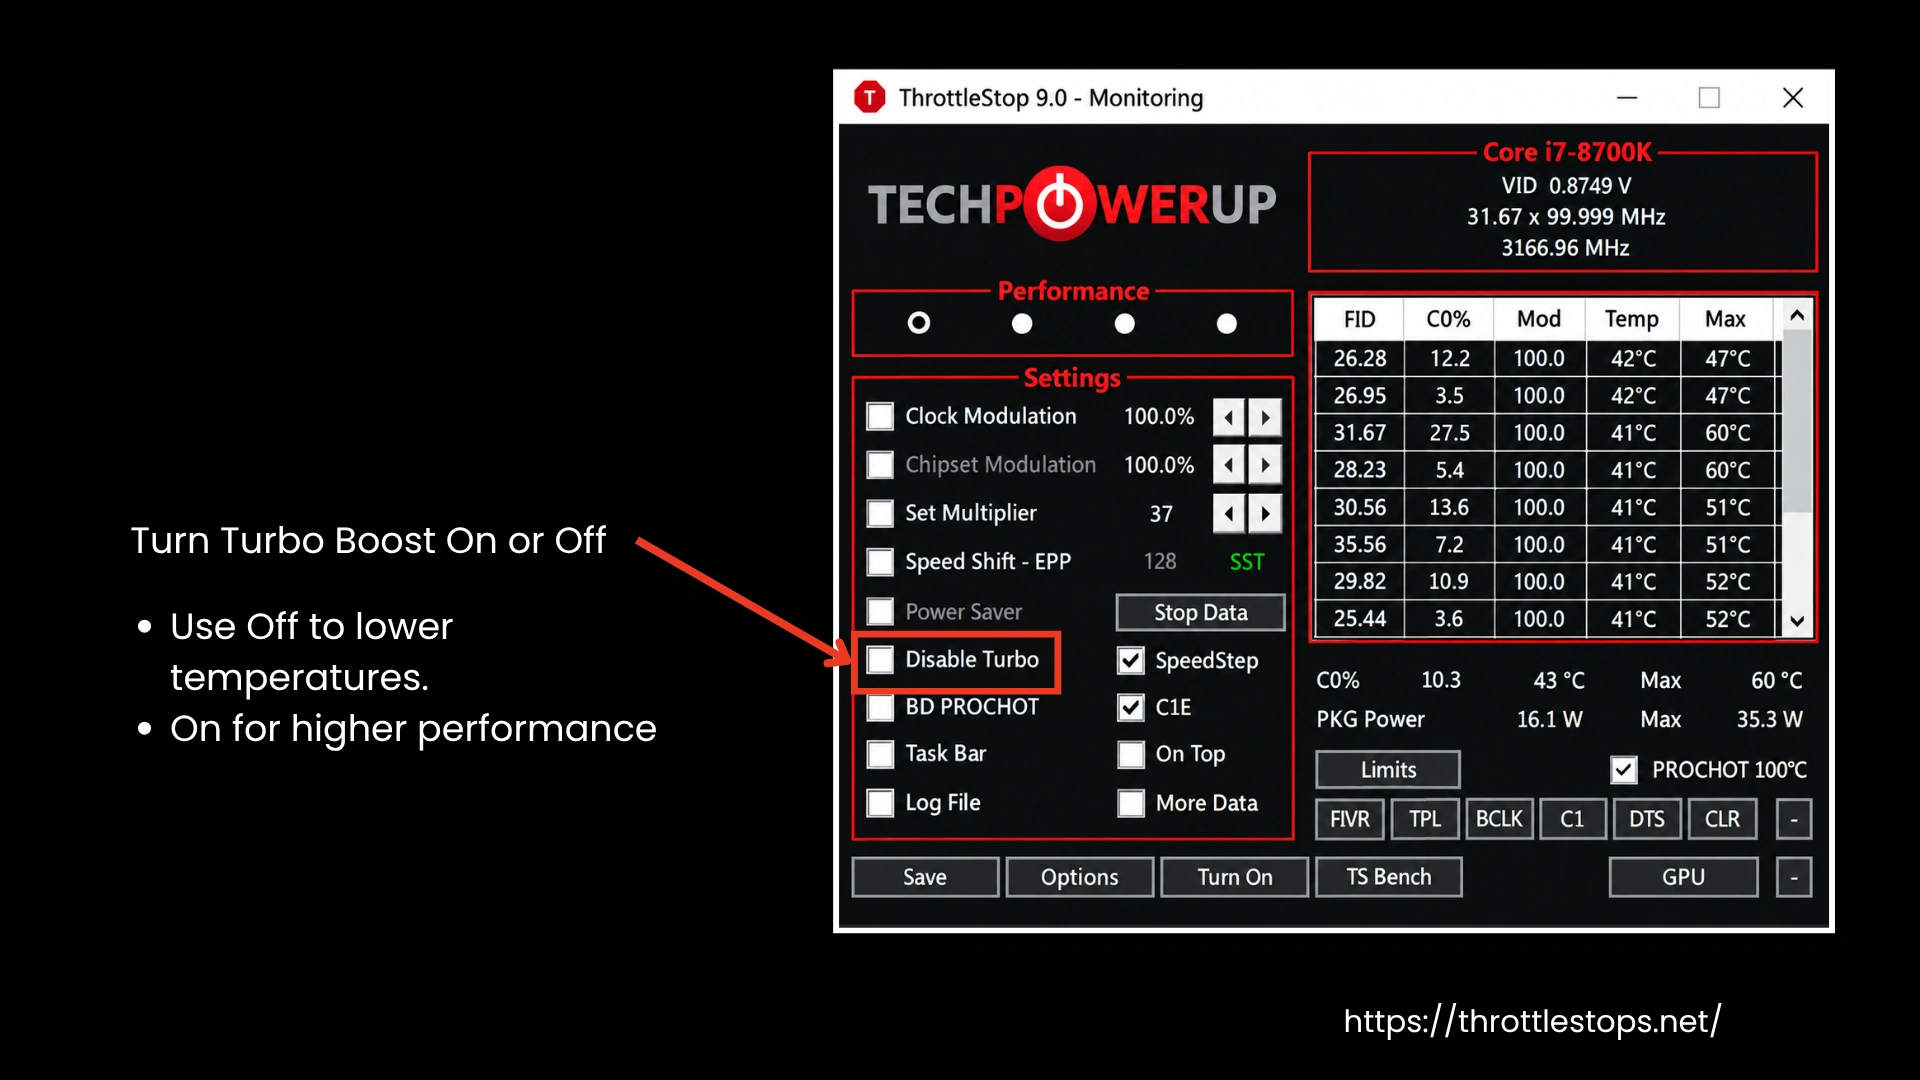
- Disable Turbo: Stops the CPU from boosting above its base clock. This reduces heat spikes and power draw but caps performance. Useful on laptops with weak cooling or shared GPU heat.
- BD PROCHOT (Bi-Directional Processor Hot): This allows other components, usually the GPU, to trigger CPU throttling when they overheat. Only use it if the goal is to prevent external components from forcing CPU throttling.
- Task Bar: Keeps ThrottleStop in the taskbar instead of minimizing the tray. This also affects where the app goes when clicking MHz or VID.
- Log File: Creates a timestamped text log of temperatures, clocks, and power usage. Useful during testing. Leave it off during daily use.
- Stop Monitoring: Pauses sensor reading and logging.
- SpeedStep: ThrottleStop SpeedStep controls software-based clock scaling on pre-Skylake CPUs. Modern systems rely on Speed Shift instead.
- C1E: Allows CPU cores to enter low-power idle states. Leaving this on reduces power use. Turning it off keeps clocks higher and raises heat.
- On Top: It keeps the ThrottleStop window above other windows.
- More Data: Logs data eight times per second instead of once. Helpful for short tests, but unnecessary for daily use.
Main Window: Right Section
This is the most important monitoring area. It shows what the CPU is actually doing in real time. Each row represents one CPU thread. CPUs with Hyper-Threading show twice as many rows as physical cores.
At the top, you’ll see your CPU model, current voltage, and active clock speed. Here’s table column meanings:
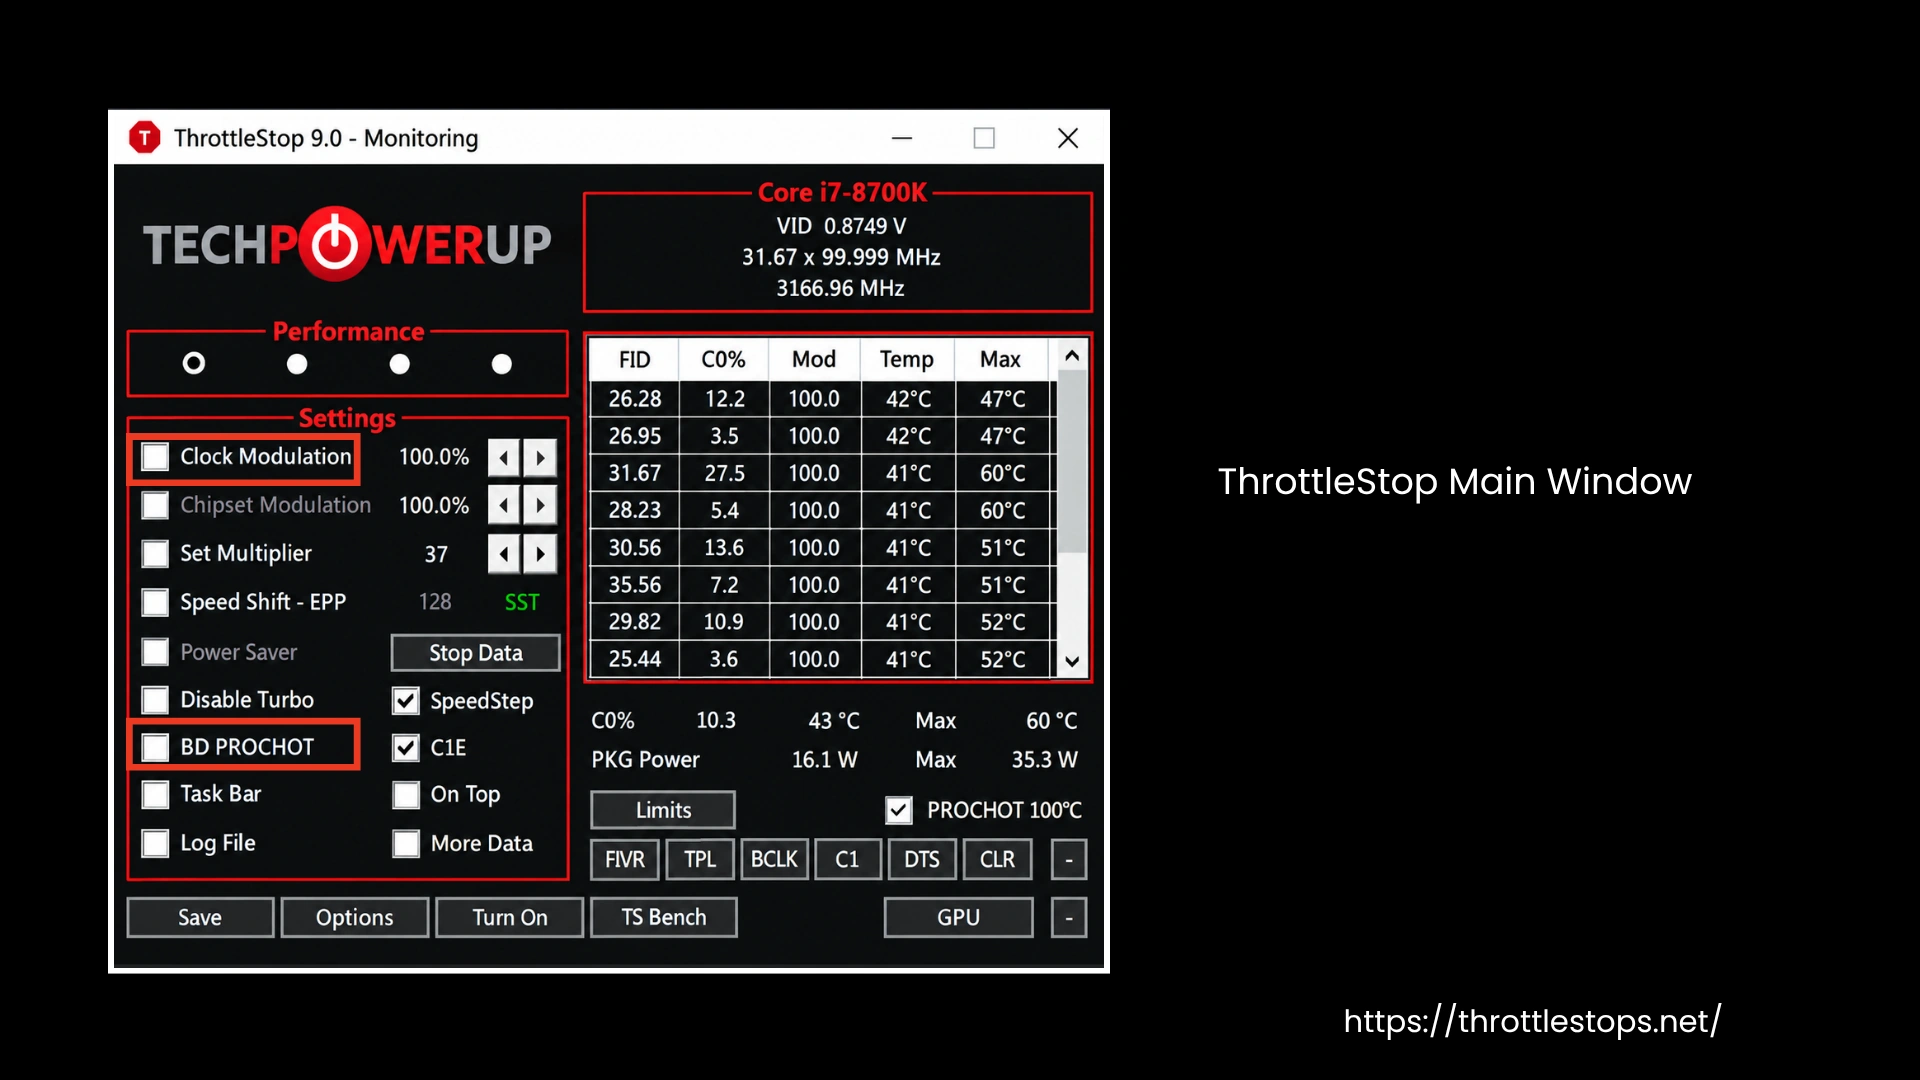
| Column | What it means | Example |
|---|---|---|
| FID | Frequency ID. This represents the clock multiplier. Multiply it by ~100 MHz to estimate speed. | FID 40 means 4.0 GHz |
| C0% | How busy that thread is. Low at idle, high under load. | 5% idle, 90% gaming |
| Mod | Clock modulation status. On modern CPUs, this should read 100%. | 100% |
| Temp | Current temperature of that core or thread (°C). | 72°C |
| Max | Highest recorded temperature. Large gaps between cores can signal poor thermal contact. | 92°C |
Under the table, you’ll find:
- Package Power (PKG Power): Estimated total CPU power draw in watts.
- Temp (Package): Overall CPU sensor temperature. This may differ from individual core readings.
- Limit Reasons: Highlights why throttling happened.
- TDP Throttle means power limits were hit.
- PROCHOT means a temperature limit was reached.
- CLR: Resets temperature and throttling history.
- DTS: Shows temperature distance from the thermal limit instead of absolute values.
- C#%: Displays how often cores enter low-power states.
- BCLK: Requests a recalculation of base clock values.
- TPL: Opens Turbo Power Limits for power and PROCHOT control.
- FIVR: Opens Fully Integrated Voltage Regulator settings for undervolting and frequency tuning.
Options
Clicking Options opens a separate window for automation and quality-of-life settings. These settings control how ThrottleStop behaves, not CPU performance directly.
Here, you can rename profiles, assign profiles to AC or battery power, and control startup behavior. Many users run ThrottleStop minimized in the tray with automatic profile switching.
If your laptop has a dedicated GPU, you can enable GPU temperature monitoring here. After selecting Nvidia or AMD, restart ThrottleStop to activate the sensor. GPU monitoring is optional unless you plan to trigger profiles based on GPU temperature. Here are the main things you’ll need to set:
- PROCHOT Offset: The default offset is 5, meaning throttling begins at 95°C. Setting it to 0 raises the limit to 100°C. Locking it prevents changes. This increases thermal headroom but also risk.
- Automatic profile switching: Profiles can change automatically based on power source. Profile names are placeholders. Each profile stores its own independent settings.
Most remaining options affect appearance or convenience. Once profiles and startup behavior are set, this menu rarely needs attention again.
How to Use ThrottleStop for Undervolting (Reduce Heat & Power)
Undervolting lowers the voltage sent to your CPU without lowering clock speeds. Less voltage means less heat, lower fan noise, and fewer throttling drops. This works on most Intel laptops, but results vary by chip quality.
Before You Start:
- Undervolting must be allowed by firmware. Some systems require BIOS options or disabled Windows security features, while others are permanently locked.
- If voltage sliders do nothing, turn off Memory Integrity (Core Isolation) in Windows
- Disable Hyper-V, Virtual Machine Platform, and Windows Sandbox if enabled
- Reboot after changes
- If values revert or stay at 0.00, delete ThrottleStop.ini and retry
Setup for CPU Core:
- Open ThrottleStop
- Leave BD PROCHOT and C1E enabled by default. But uncheck both of them if there’s sudden throttling caused by external sensors.
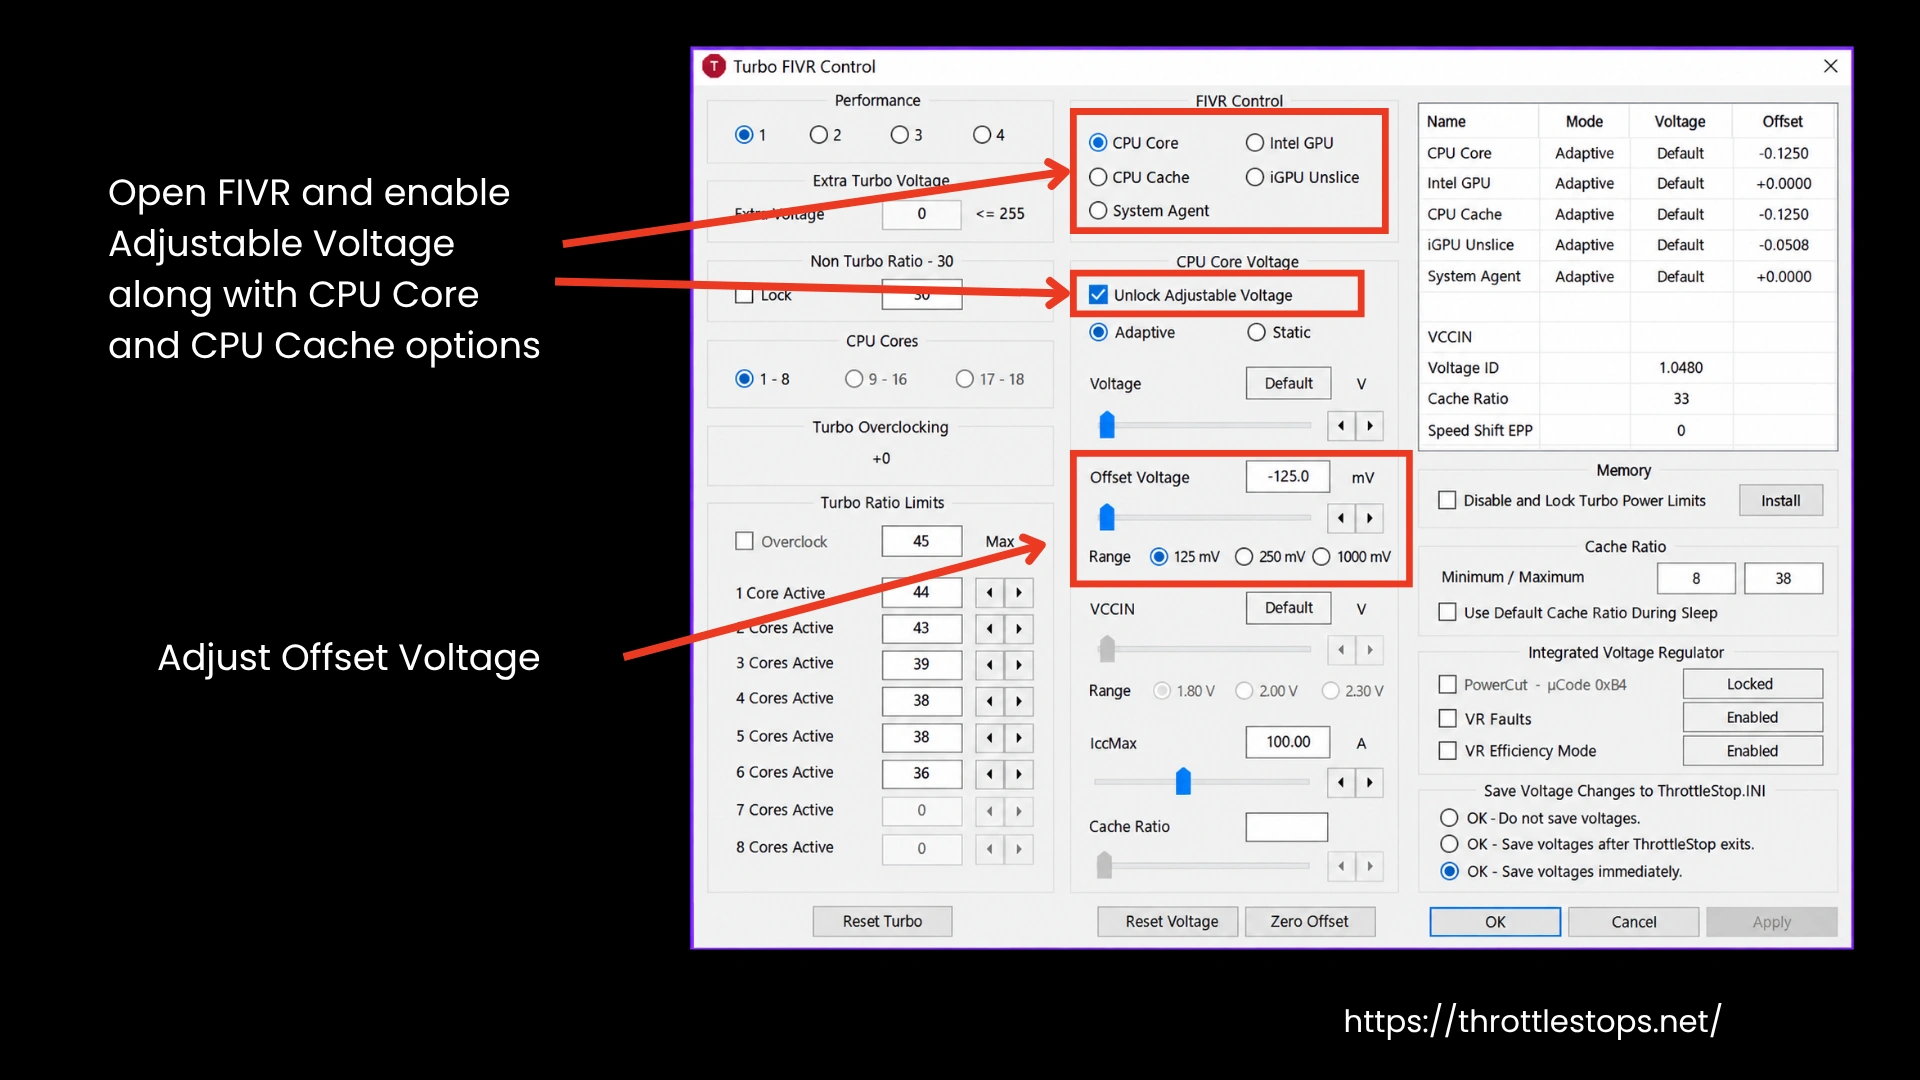
- Click “FIVR”
- Check “OK – Save voltages immediately”
- Select CPU Core (other options will include Intel GPU, CPU Cache, etc)
- Check Unlock Adjustable Voltage
- Set voltage mode to Adaptive
- Use Offset Voltage only
- Start with -60 mV to -80 mV
- Click Apply
CPU Cache Settings:
- Select CPU Cache
- Unlock adjustable voltage
- Set offset close to Core (it’ll be a slider)
Example: Core -80 mV to Cache -60 mV - Drag IccMax to maximum for all items
- Click Apply
Core and Cache usually need similar values. Cache limits how far the Core can go. If you experience instability, you can try setting the Cache to about 3/4 of the Core’s value (e.g., -100mV Core and -75mV Cache). Another setting is for Intel GPUs. We recommend leaving it at 0 mV unless you know what you’re doing. GPU undervolts can cause wake-from-sleep crashes.
Stability Testing:
- Run TS Bench 960M for 60 seconds or use Cinebench R23
- Increase voltage by 5-10 mV and test again. If you see:
- Freezes
- Blue screen
- TS Bench errors
- If it completes without errors, you're stable
- Keep increasing in -10 mV to -15 mV steps
- Test after each change
- Stop when you get any of the above errors.
- Go back to your last stable value (reduce by 10mV from crash point)
Typical Stable Ranges
Every CPU is different but here are safe ranges:
If undervolting alone does not stop throttling, move to power limits.
How to Use TPL in ThrottleStop
Power limits control how many watts the CPU can draw. Laptop makers often set these very low using hidden limits. Turbo FIVR Control manages these limits to balance heat and performance. Here’s what ThrottleStop TPL Windows means:
| Setting / Term | What it is / Purpose | Why it Matters |
|---|---|---|
| MSR | Internal CPU Registers. These are the standard limits set by the CPU architecture. | This is what you normally edit to increase or decrease performance. |
| MMIO | Memory Mapped I/O. An external set of limits often "hidden" by the laptop manufacturer. | Even if MSR is high, a low MMIO limit will force your CPU to throttle. |
| Sync MMIO | A checkbox that forces the MMIO limits to match your MSR limits. | Vital for stopping the "secret" manufacturer limits from overriding your custom settings. |
| MMIO Lock | A checkbox that completely disables/locks the MMIO register. | Recommended if your laptop keeps "resetting" its power limits during games. |
| PL1 (Long Power) | Sustained Power Limit. The wattage used during long tasks (gaming/rendering). | Controls the "steady state" temperature of your laptop. |
| PL2 (Short Power) | Boost Power Limit. A temporary high-wattage burst for quick tasks. | Helps with snappiness, but can cause instant heat spikes if set too high. |
| Turbo Time Limit | The duration (in seconds) the CPU can stay at PL2 before dropping to PL1. | Prevents the laptop from overheating during a long "boost" phase. |
| Clamp | A hard restriction. If checked, the CPU must stay below the limit. | If unchecked, the CPU might briefly ignore the limit, leading to better spikes but higher heat. |
Step-by-Step TPL Setup:
- Open ThrottleStop
- Click TPL
- Check MMIO Lock. Do not enable Sync MMIO when MMIO Lock is checked.
- Set power limits (for safe starters):
- PL1: 45-65W
- PL2: Match PL1 for stable behavior
- Find “Turbo Ratio Limits” in the TPL window and start to lower 1-core and 2-core ratios by 3-4 steps (like 58 to 54). Set the all-core ratio to the clock your CPU can hold under full load (Example: if it throttles at 3.9 GHz, set all cores to 39).
- Enable Speed Shift. Leave Turbo Time Limit unchanged.
- Check both Clamp boxes.
- Click Apply
- If red POWER text appears under load, clock speeds stop bouncing, and temperature spikes reduce, then it’s working.
- If heat is still high, then try lowering turbo ratios, not wattage (see step 5).
How to use ThrottleStop to Overclock CPU
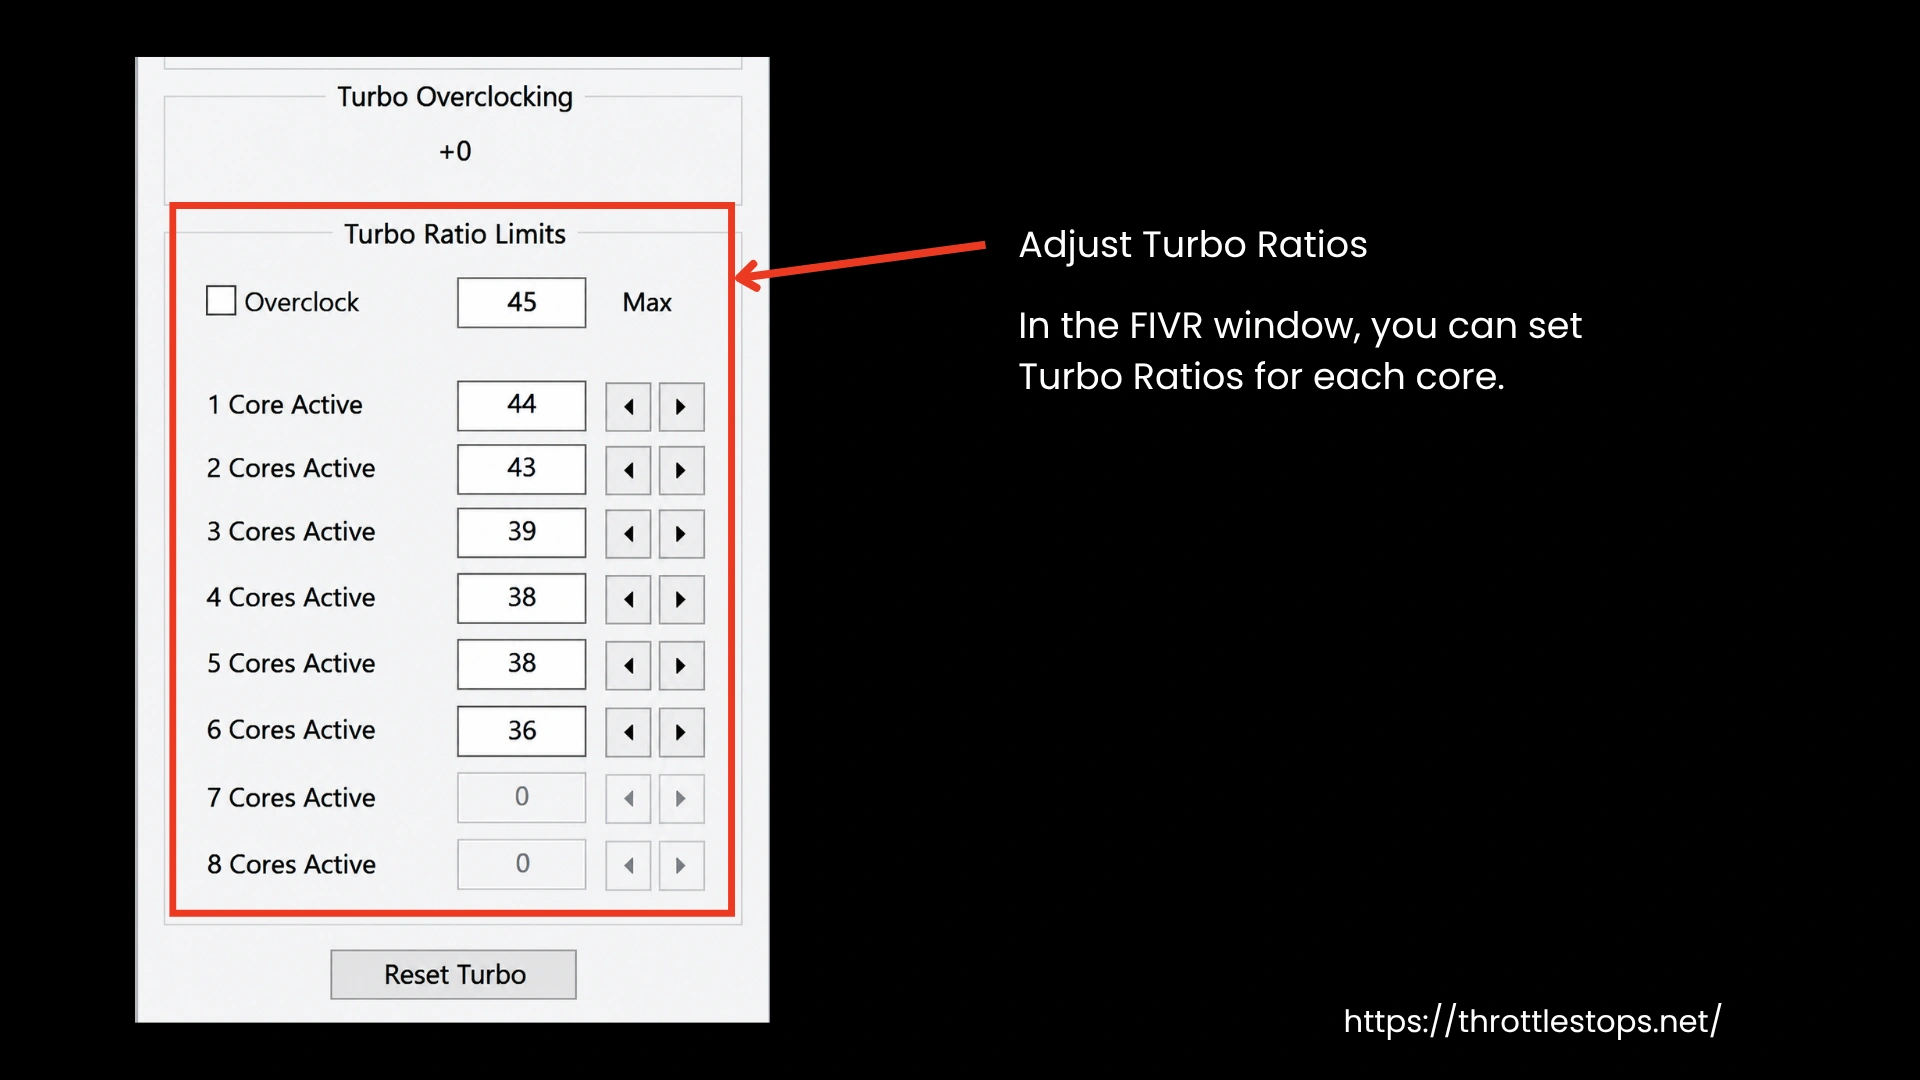
Overclocking raises CPU frequency by increasing turbo multipliers. Higher multipliers increase heat and power draw quickly, which limits their usefulness on laptops. This approach only makes sense after temperatures are already stable.
On most modern CPUs, multiplier control happens through turbo ratio limits, not the Set Multiplier option:
- Open ThrottleStop
- Click FIVR
- Check Turbo Ratio Limits
- If marked “Not Supported”, overclocking is blocked
- If not, then increase ratios by 1-2 steps (Example: 45 to 46)
- Click Apply
- Monitor the FID column on the main screen (46.00 would mean 4.6 GHz)
- Stress test using TS Bench or Cinebench.
If you see “Thermal Throttling” or experience a BSOD, you have pushed the frequency too high for your cooling system. In practice, undervolting delivers more consistent performance than overclocking on laptops.
Note! ThrottleStop for AMD Systems
ThrottleStop does not support AMD CPUs. You will see a “CPU Not Supported” message. You can use AMD APU Tuning Utility (AATU) for laptops. ThrottleStop can only monitor temperatures on AMD systems. Do not use it for tuning.
Tips For Using ThrottleStop Safely
Here are some tips we've gathered from undervolting and overclocking different setups. These can help you keep temperatures controlled, avoid crashes, and get consistent performance from ThrottleStop on most laptops.
Use Multiple Profiles Smartly
Set separate profiles for charging and battery use. Keep the plugged-in profile performance-focused with lower Speed Shift values. Use a battery profile with Turbo disabled and higher Speed Shift values to cut heat and extend battery life without manual switching.
Create a Temperature Failsafe Profile
Add a third profile that activates automatically at a chosen temperature. Use alarms to trigger it. Lower turbo ratios or raise Speed Shift values in this profile to cap heat. Once temperatures drop, ThrottleStop switches back automatically, giving you a custom thermal ceiling.
Run ThrottleStop on Startup
ThrottleStop resets after reboot unless it starts with Windows. Use Task Scheduler to launch it at startup. This keeps undervolts, power limits, and profiles active every time, preventing sudden performance drops caused by default manufacturer settings loading first.
Test Stability Under Real Load
Always stress test after changes. Short benchmarks show limits, but longer runs confirm stability. Use Cinebench or demanding games. Any crash, error, or blue screen means the undervolt is too aggressive. Increase voltage slightly and retest until daily use stays stable.
Watch the Log File Over Time
Enable the log file to track temperatures, clock speeds, and throttling behavior. Logs reveal patterns you miss in short tests. This helps spot power limits and compare results after tuning changes instead of relying on memory or guesswork.
Start Tuning While Plugged In
Begin all tuning with the charger connected. Power limits, turbo behavior, and voltage response change on battery. Stable results on AC give a reliable baseline. Afterward, adjust battery profiles separately to avoid confusing results or false instability during testing.
Optimize Turbo Ratios for Real Gains
Lowering turbo ratios is often more effective than undervolting alone. High boost clocks add heat fast with little benefit. Set all cores near the sustained clock where throttling starts. This cuts power draw, reduces noise, improves gaming stability, and helps the GPU breathe.
Conclusion
ThrottleStop is not magic, and it will not fix every laptop instantly. When used correctly, it gives you control over heat, power limits, and boost behavior that manufacturers often lock down. This guide showed how throttlestop works in real conditions and how to use throttlestop to stop overheating without guesswork. Results depend on hardware, firmware limits, and patience. Test slowly, trust data, and adjust based on sustained behavior, not short wins.
FAQs
ThrottleStop gives better control over CPU throttling, undervolting, and temperatures. It runs reliably in the background, while Intel XTU often resets settings or crashes after sleep.
Most i5-9300H CPUs stay stable between -100mV and -150mV on core and cache. Start small, test stability, and stop lowering voltage once errors appear.
Lower turbo ratios slightly instead of heavy underclocking. Combine mild clock limits with undervolting to reduce heat while keeping stable FPS during long gaming sessions.
Undervolting does not permanently damage a CPU. An unstable setting can crash the system, but hardware stays safe once you reboot and adjust voltage back.
Use undervolting to control heat, keep Turbo enabled, set Speed Shift EPP to 0, and use High Performance mode to avoid power or thermal throttling.